The following short story is the turn-by-turn result of an actual tabletop game of Battletech I played with my son and brother a while back. I thought I'd post it for folks to read and enjoy. :)
------------------------
The searing late afternoon sun was slowly sinking behind the ominous grey clouds that were now rolling over the sparsely forested
plains. I was dropped in alone on this planet with the sole purpose of eliminating the resistance which I was told consisted of a
couple of light 'mechs owned by a local family which was causing trouble for the Commonwealth lately. A couple of light mechs
shouldn't pose much of a problem for my battle-hardened 5SA Hermes II. 40 tons of steel wrapped defensively around a Large Pulse
Laser, a flamer and a brutal UAC-5. The only odd thing was that the Lyrans didn't send the typical 'scout' lance consisting of about
four or five hundred tons of walking death. I chuckled to myself. I'm pretty sure that the other Mechwarriors back home at the
Facebook Inn would ridicule me for joking about something so cliche and overdone.
Checking that my reactor, sensors and weapons were all online I expertly maneuvered my 'mech to a good scouting position in a nearby
thicket. I figured it would be pretty good cover in the event my radar picked anything up. Turns out I didn't have to wait very long.
I wasn't expecting the sudden blip on my radar that came to life immediately to my left, not 100 meters off. Sonofagun! I should have
known better, not knowing what was on the other side of the brush coming my way I backed up further into heavier forestry while
turning to face the new threat. Adrenaline started to pump through my veins as the enemy 'mech came partly into view at my 10. I
could see clearly that it was a Cicada. Fast little devils those. I was already firing. Nearby leaves burned and vibrated as my large
pulse laser pumped through the air toward its target. Even as the laser burned into the Cicada's left torso I hammered my autocannon
in short, two-round bursts. One round hit its target, shredded armor splintered off in a red-hot display of fireworks. In response it
fired twin medium lasers of its own that seared into my right leg. The hairs on the back of my neck started to rise of their own
accord just as I remembered the Cicada's dirty little secret. White-hot lightning erupted from it's torso and connected with my
'mech. Struggling to get my bearings back as my computer systems came back into focus I glanced down to see that my left torso was
blinking orange. The on-board computer 'Betty' calmed reported 'Critical Hit, left torso' followed by several alarms buzzing all
around me. Damned thing melted half the armor across my shoulder. That won't do. Backing further through the woods I lost sight of
the enemy, but not before I blasted several chunks of armor off it's right leg and center torso.
Momentarily out of sight I checked my weapons and systems once more. Everything still in working order but my left torso had
sustained significant damage. I was already moving again as the Cicada emerged from the thicket. The pilot seemed rather green with
the way he was piloting in a slow straight line, I could see his torso swiveling to locate me as he walked out from behind the
tree's. With a sneer I let loose everything I had at 90 meters, inluding a huge jet of flame to hopefully cook him a bit inside that
cockpit. The Cicada seemed to stagger under the barrage as armor was shredded and melted from its chassis. Suddenly dirt and mud
kicked up violently at my 'mech's feet showering my view with bits of rock and dirt clods and just like thunder after lightning a
split second later I heard the telling distant concussion of an autocannon being fired. A really large autocannon. With a sinking
feeling and a knotted stomach I jerked my torso to the right. At roughly 200 meters to my 1 o'clock a Hunchback came fully into view.
Damn my luck! A couple of lights my ass! Cursing my superiors I started to walk toward the Cicada who was still disoriented from the
last round of fire. The Hunchback was angling more to my north in an effort to join with the Cicaca and cut me off from the forest.
Another round blasted forth from the Hunchback's cursed shoulder cannon, narrowly missing my 'mech and exploding several tree's off
to my left into splinters. As it closed the distance and I struggled to bring it under my crosshairs I just had time to see one of
its medium lasers burn through the air a few feet from my head and a split second later the other one lit my cockpit up in a jarring,
nerve-shredding hell come to life. My vision blurred and I could see blackness creeping in from the outer edges of my vision. Hearing
nothing but the ringing in my own ears I fought to stay conscious. The world spun and sparks from another PPC blast that landed
somewhere on my right torso slowly etched their way across my vision for what seemed like an eternity. Stay awake. Stay AWAKE! With a
sickening lurch the world around me came back and I realized I was screaming. Before I knew what I was doing I had already somehow
swiveled my mech around in a dead run to flank the heavier Hunchback. My heart hammered against my ribcage in rythmic harmony with
the heavy footsteps of my battlemech as I came around just outside its firing arc and fired off everything I had into its exposed
back. My large laser fell short and burned a few wicked scars through its leg and my UAC peeled two nastly holes into its right and
center rear torso but it wasn't enough. The hulk was too heavily armored.
I caught sight of the Cicada to my 7 as the Hunchback suddenly shifted its course and turned quickly back around to its right and
then had me in its sights. This was a more experienced pilot I was up against. I had nowhere to go, I was cornered. Any closer and
that AC20 would punch a hole through me big enough to drive a truck through so I focused everything I had into putting as much
distance as I could between myself and the Hunchback. The Cicada, emboldened by his ally was perilously close now. I was forced to
back up to keep both him and the Hunchback nightmare in my sights. Another PPC shot cracked through the air and ripped into my right
leg. Red lights flashed up at me as Betty calmy, almost soothingly informed me that I had sustained a critical hit. Another medium
laser cut forth from the Cicada and burned completely through my left torso, finishing off the earlier damage it had done as well as
my flamer. My 'mech shuddered as the components sparked and flared as the white-hot armor melted into circutry. My blackened left arm
dropped heavily to the ground in a smoldering ruin.
This is how it ends then. A dozen kills under my name and I thought I was invincible. Clan-like even. With a half-smile I eyed the
Hunchback, struggling to imagine the face on the other side of that cockpit visor. Was he laughing maniacally? I somehow knew he was.
There was no doubt. Laughing like a 6 year old boy showing off in front of company by besting his Dad. He surely was laughing. I knew
I had no chance at bringing his 'mech down. I shifted my torso to face the Cicada, who like the Hunchback had now slowed to a stop.
This was it. This is the end. I gritted my teeth and through the black smoke billowing from my broken 'mech I fired my remaining
large pulse laser and Ultra Autocannon 5 at the Cicada in a last-ditch attempt at revenge. A maelstrom of burning light and smoke and
ruin erupted on the plains. It all happened so fast. The Cicada's left torso and 'arm' blew off as the 'mech struggled to stay on its
feet under my last round of heavy fire. The Hunchback's medium lasers punched into my left leg and center torso but the last thing I
remember after bitteryly punching the eject button and sailing up into the air was the ear-splitting metallic clang of a heavy
autocannon round slamming into my 'mech's torso, knocking the smoking ruins of the 'mech backwards and down hard into the soil.
Friday, June 26, 2015

Thursday, January 7, 2010
New rock and stock in the 50!
I received the 50lb box of Key Largo dry rock yesterday and had a pretty good time laying it all out and figuring out how we wanted to arrange the rock. The rock itself was ordered from marcorocks.com and there was very little breakage during shipping, probably a small handful of rubble which was nice actually. It's very heavy rock and is practically a big system of holes and tunnels. Some may not like it but I thought it looked neat! Anyway, Carly decided on a 'cove' style build so I measured the tank and laid out some paper on the bar to the size of the tank and started putting the rock together. Here are some pics of the rock, there was a pretty good sized large piece and several mid-sized chunks and a few smaller pieces. Good thing I only ordered 50lbs because more would have been too much for the display with what I had already.


A few pics of the rock actually inside the tank. I was afraid I might bury some snails and hermits but I think they are all still there. A note here on setting up a reef. You really want to have the rock in there BEFORE you put the sand in, but due to budget constraints that didn't happen so I buried them in the sand as much as possible so that anything making a tunnel underneath it (gobies/shrimp) might not get crushed from an avalanche. Water was of course milky for a few hours but then everything started to settle and by the next day it was all clear.


I actually had ordered a few critters and a fish from an online source and got free shipping thanks to Nathan Paden (padens.com) and the guys and gals over on the Lubbock Reef Club (lubbockreefclub.com) because it was a group order. I got an Emerald Crab, a Peppermint Shrimp and an Eyelash Blenny. After I finally got them in the tank after the Fedex truck was 2 hours behind, in this cold no less, I was skeptical that anything would survive, but they all are doing fine so far and the Eyelash Blenny is a hoot to watch! He definitely has some personality and the wife and kiddo's really like to sit and find him in the rockwork. He seems to get really curious when someone is around the tank and peeps his little head out and looks around with the most silly looking face I've seen on a fish.


A few pics of the rock actually inside the tank. I was afraid I might bury some snails and hermits but I think they are all still there. A note here on setting up a reef. You really want to have the rock in there BEFORE you put the sand in, but due to budget constraints that didn't happen so I buried them in the sand as much as possible so that anything making a tunnel underneath it (gobies/shrimp) might not get crushed from an avalanche. Water was of course milky for a few hours but then everything started to settle and by the next day it was all clear.


I actually had ordered a few critters and a fish from an online source and got free shipping thanks to Nathan Paden (padens.com) and the guys and gals over on the Lubbock Reef Club (lubbockreefclub.com) because it was a group order. I got an Emerald Crab, a Peppermint Shrimp and an Eyelash Blenny. After I finally got them in the tank after the Fedex truck was 2 hours behind, in this cold no less, I was skeptical that anything would survive, but they all are doing fine so far and the Eyelash Blenny is a hoot to watch! He definitely has some personality and the wife and kiddo's really like to sit and find him in the rockwork. He seems to get really curious when someone is around the tank and peeps his little head out and looks around with the most silly looking face I've seen on a fish.


Tuesday, December 8, 2009
50 gallon WIP
Well I've finally got my 50 gallon up and going. It's actually had water in it cycling for about a month but I just got my lights wired in the other day. I ordered a TEK T5 retrofit kit with AquaActinics reflectors which are supposed to be some of the best out there, and a couple of UVL bulbs, one white and one super actinic. I mounted the ballast on the back of the canopy and have been monitoring the heat, so far it's gotten hot but not too bad which I suppose is normal for a ballast. I know I need more rock but this project has been on a 'deal-only' basis and I've been biding my time buying this and that for it as I come across awesome deals. I am very satisfied with how it's turned out so far, hopefully now with the lights in we'll get an ugly algae bloom so I can get my clean up crew (hermits and snails etc) and finally have some life in this thing! As it is I've got one lone anemone/coral something or the other with clear bulb-like tips that comes out at night and can be seen clearly with a flashlight...oh yeah, and lots and lots and lots of tiny little copepods everywhere! Good stuff, can't wait to see some coraline growth :)
Anyway, here is the tank and stand before I sanded, stained and modded it for reefing, this was a few months ago (notice the single bulkhead at the bottom):

Had to build up an acrylic box around that bulkhead and then I built a 'Durso' standpipe in there to silence the drain so it didn't sound like a toilet. Lots and lots of stuff on the internet to DIY. I'm a helpless noob so thanks to my buddies and fellow reef-a-holics out there for all the tips.
Here is a recent shot of what it now looks like:

And because I LOVE the blue glowing look and one of the main reasons it's sitting in our living room currently...


For the sump below I've just got a 20 gallon long with a couple of baffles and a huge mess of PVC and a cheap skimmer (Coralife), here's a shot of some of the guts down there:

Anyway, definitely more to come, I think now I will focus on cleaning up some wires and do some power management. Need to buy a reef master test kit, a magfloat and probably need another powerhead to move some water in the display tank a bit more.
-Clay
Anyway, here is the tank and stand before I sanded, stained and modded it for reefing, this was a few months ago (notice the single bulkhead at the bottom):

Had to build up an acrylic box around that bulkhead and then I built a 'Durso' standpipe in there to silence the drain so it didn't sound like a toilet. Lots and lots of stuff on the internet to DIY. I'm a helpless noob so thanks to my buddies and fellow reef-a-holics out there for all the tips.
Here is a recent shot of what it now looks like:

And because I LOVE the blue glowing look and one of the main reasons it's sitting in our living room currently...


For the sump below I've just got a 20 gallon long with a couple of baffles and a huge mess of PVC and a cheap skimmer (Coralife), here's a shot of some of the guts down there:

Anyway, definitely more to come, I think now I will focus on cleaning up some wires and do some power management. Need to buy a reef master test kit, a magfloat and probably need another powerhead to move some water in the display tank a bit more.
-Clay
Wednesday, August 26, 2009
Updated 9 Gallon Reef Pics
Well, some of my Coraline has turned white instead of the deep purple it was, so that's kindof a bummer. But other than that things are growing and looking very nice. No algae or cyanobacteria to be seen! I keep the refugium light on growing a bundle of Chaeto back there pretty much at all times. I imagine I'll need to order some more lights here pretty quick just in case these go out anytime soon. Never can tell with stock lights...anyway, here are some pictures!
Here is the front tank shot as it sits on my desk here at work. Hard to get anything done with this thing but it sure does make for attractive decor.

My two Clownfish, kids named them Nemo 1 and Nemo 2 of course :)

These are my two SPS (Small Polyp Stony) Corals, they branch and grow all different ways. Pretty cool to watch them grow over a period of months or even weeks.
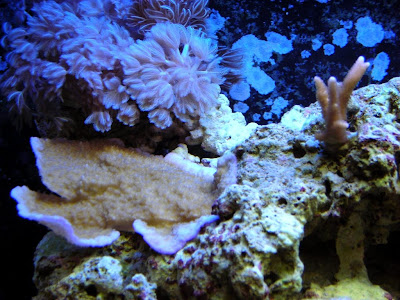
This is one of my favorites, it's called a Frogspawn, it's a LPS (Large Polyp Stony) and is pretty mean to anything that it touches.

The CandyCane LPS Coral, another one of my favorites, it will eventually split and grow into more 'heads' and branch out. It has feeder tentacles that come out of it at night, looks really cool!

Here is the front tank shot as it sits on my desk here at work. Hard to get anything done with this thing but it sure does make for attractive decor.

My two Clownfish, kids named them Nemo 1 and Nemo 2 of course :)

These are my two SPS (Small Polyp Stony) Corals, they branch and grow all different ways. Pretty cool to watch them grow over a period of months or even weeks.

This is one of my favorites, it's called a Frogspawn, it's a LPS (Large Polyp Stony) and is pretty mean to anything that it touches.

The CandyCane LPS Coral, another one of my favorites, it will eventually split and grow into more 'heads' and branch out. It has feeder tentacles that come out of it at night, looks really cool!

Monday, August 10, 2009
Bathroom Project
Well, I spent the better part of 2 weekends ripping out part of my bathroom walls, redoing the guts and re-tiling the wall. It all started with a musty odor with visible mold and the wife having headaches. The house we moved into 4 years ago was already 30 years old. It's a big house for what we paid for it though :) Well anyway, I took a rubber mallet to about 20 square foot of the wall all around the tub where the mold was visible. As it turned out, it was rotten all the way to the insulation. So I ripped that out and replaced it and a few boards. Here are some photo's of yours truly right before I took out the existing tile with extreme prejudice and the mess that resulted. (it's pretty gross, fair warning!)


After replacing the insulation:

A word on plumbing, HELL. The plumbing needed to be replaced obviously, it really dated the house and I wanted something new anyway. Little did I know I was going to drop $60-70 on Sharkbite connectors to install the new system. If you've never heard of Sharkbite fittings and you are ever going to do any copper pipe work, do yourself a favor and check these out here. They work miracles and you don't have to solder anything. Unfortunately I was so involved in what I was doing I neglected to take some pictures of the new shiny copper fortune I had created that would never be seen again (hopefully). Anyway, once this was done it was time to seal it all up...
So some genius decided they would use regular drywall behind the tile instead of some sort of mold-resistant cement backing so I decided to fix that and installed Hardiebacker Cement board. Let me tell you, this stuff is a royal pain to cut. Not to mention I had to double-back the boards (1/2"x2) in order to keep the right depth. I am glad I went with it in the end though, because it's solid and will resist mold and mildew.


So the tiling was not fun. Here's the story. I had purchased tile from Home Depot because it was the only place in town that stocked the 'Bone' color tile that matched the rest of the wall. Well, I start to throw a few pieces up there to see how they would look ... the grout line was off by 1/16" after about 3 tiles because the edges of the tiles I purchased were beveled. This completely stopped me in my tracks and I searched and searched for the next week trying to find the correct tile color without the beveled edges on the tile. Here's a picture to illustrate:

Fed up and ready to complete the project, I just decided to improvise. I put in a border (just the border cost me $60 in tile, highway robbery I say) and changed the pattern of the tile from straight to angled. I borrowed a wet saw (and a beer or two) from my neighbor and started measuring and cutting the tile I got from Home Depot with the hated beveled edge. Took me all durn weekend to cut all those crazy angles. Once I finally finished tiling Sunday evening I threw the grout up there and installed the faucet and handle assembly. I finally finished this project up at 12am sharp on Monday morning. Amazingly, after 2 weekends of this, I am still married but I'm sure my kids doubt my sanity now after seeing Daddy in the bathroom for 18-20 hours all weekend talking to himself and ignoring everybody with a funny look in his eye.
(click to enlarge the pics)


Next project, retiling the floor. Although I don't expect this to take much effort I hold no illusions about Mr. Murphy and his antics...


After replacing the insulation:

A word on plumbing, HELL. The plumbing needed to be replaced obviously, it really dated the house and I wanted something new anyway. Little did I know I was going to drop $60-70 on Sharkbite connectors to install the new system. If you've never heard of Sharkbite fittings and you are ever going to do any copper pipe work, do yourself a favor and check these out here. They work miracles and you don't have to solder anything. Unfortunately I was so involved in what I was doing I neglected to take some pictures of the new shiny copper fortune I had created that would never be seen again (hopefully). Anyway, once this was done it was time to seal it all up...
So some genius decided they would use regular drywall behind the tile instead of some sort of mold-resistant cement backing so I decided to fix that and installed Hardiebacker Cement board. Let me tell you, this stuff is a royal pain to cut. Not to mention I had to double-back the boards (1/2"x2) in order to keep the right depth. I am glad I went with it in the end though, because it's solid and will resist mold and mildew.


So the tiling was not fun. Here's the story. I had purchased tile from Home Depot because it was the only place in town that stocked the 'Bone' color tile that matched the rest of the wall. Well, I start to throw a few pieces up there to see how they would look ... the grout line was off by 1/16" after about 3 tiles because the edges of the tiles I purchased were beveled. This completely stopped me in my tracks and I searched and searched for the next week trying to find the correct tile color without the beveled edges on the tile. Here's a picture to illustrate:

Fed up and ready to complete the project, I just decided to improvise. I put in a border (just the border cost me $60 in tile, highway robbery I say) and changed the pattern of the tile from straight to angled. I borrowed a wet saw (and a beer or two) from my neighbor and started measuring and cutting the tile I got from Home Depot with the hated beveled edge. Took me all durn weekend to cut all those crazy angles. Once I finally finished tiling Sunday evening I threw the grout up there and installed the faucet and handle assembly. I finally finished this project up at 12am sharp on Monday morning. Amazingly, after 2 weekends of this, I am still married but I'm sure my kids doubt my sanity now after seeing Daddy in the bathroom for 18-20 hours all weekend talking to himself and ignoring everybody with a funny look in his eye.
(click to enlarge the pics)


Next project, retiling the floor. Although I don't expect this to take much effort I hold no illusions about Mr. Murphy and his antics...
Friday, June 26, 2009
Frogspawn and Hammer Coral
I just got an awesome deal from a hobbyist I work with on a nice sized Frogspawn and Hammer frag. Man they look nice! I really need to stop getting things for this tank. The hobby is so addicting!
Anyway, I also got a bag of Chemi-Pure Elite to combat yet another outbreak of cyanobacteria. We'll see how it goes!
Pics:


Anyway, I also got a bag of Chemi-Pure Elite to combat yet another outbreak of cyanobacteria. We'll see how it goes!
Pics:


Tuesday, June 9, 2009
Updates
Well, it's been a little while since I've updated but the Nano is doing well. I have a lot more coraline growth, things are crisp and the fish and corals look healthier than ever!
I am still seeing creeps of Cyano here and there but I guess that stuff just comes and goes. Just as long as it stays under control I guess I can deal with it.

I am trying to figure out how to take decent closeups...I think this is the best my little Sony Cybershot 7.2 is able to achieve..


I am still seeing creeps of Cyano here and there but I guess that stuff just comes and goes. Just as long as it stays under control I guess I can deal with it.

I am trying to figure out how to take decent closeups...I think this is the best my little Sony Cybershot 7.2 is able to achieve..


Subscribe to:
Posts (Atom)
